获取元素
DOM最根本的对象document (实际上是window . document ), 表示文档对象
每个载入浏览器的HTML文档都会称为document对象,把文档中每个标签都解析为对象
“document对象可以从脚本中对HTML页面中所有的元素进行访问”
1.getElementById( ) / getElementsByTagName( ) getElementById( ) 通过 id 获取节点 1 2 3 4 5 6 7 8 9 10 11 12 13 14 15 <body > <div id ="time" > 2019-9-9</div > <script > var time = document .getElementById ('time' ); console .log (time); console .log (typeof time); console .dir (time); </script > </body >
getElementsByTagName( ) 获取过来元素对象的集合 以 伪数组 形式储存
1 2 3 4 5 6 7 8 9 10 11 12 13 14 15 16 17 18 19 20 21 22 23 24 25 26 27 28 29 30 31 32 33 34 <body > <ul > <li > 演示文档1</li > <li > 演示文档2</li > <li > 演示文档3</li > <li > 演示文档4</li > <li > 演示文档5</li > </ul > <ol id ="ol" > <li > 01</li > <li > 02</li > <li > 03</li > <li > 04</li > </ol > <script > var lis = document .getElementsByTagName ('li' ); console .log (lis); console .log (lis[0 ]); for (var i = 0 ; i < lis.length ; i++) { console .log (lis[i]); } var ol = document .getElementById ('ol' ); console .log (ol.getElementsByTagName ('li' )); </script > </body >
xxxxxxxxxx Document
html接受一个参数**(属性name的值)** ,这个方法会返回带有给定name 特性的所有元素.
2.H5新增获取节点方法 1 2 3 4 5 6 7 8 9 10 11 12 13 14 15 16 17 18 19 20 21 22 23 24 25 26 27 <body > <div class ="box" > 盒子1</div > <div class ="box" > 盒子2</div > <div id ="nav" > <ul > <li > 首页</li > <li > 产品</li > </ul > </div > <script > var boxs = document .getElementsByClassName ('box' ); console .log (boxs); var firstBox = document .querySelector ('.box' ); console .log (firstBox); var nav = document .querySelector ('#nav' ); console .log (nav); var li = document .querySelector ('li' ); console .log (li); var allBox = document .querySelectorAll ('.box' ); console .log (allBox); var lis = document .querySelectorAll ('li' ); console .log (lis); </script > </body >
getElementsByClassName(‘box’); 根据类名获取某些元素集合 querySelector(‘.box’); 返回指定选择器的第一个元素对象 (切记 选择器要加符号 .box #nav querySelectorAll(‘.box’); 指定选择器所有元素对象集合
3.body,html获取 1 2 3 4 5 6 7 8 9 10 <body > <script > var bodyEle = document .body ; console .log (bodyEle); var htmlEle = document .documentElement ; console .log (htmlEle); </script > </body >
4.获取伪元素 (1)getComputedStyle() 虽然js中没有明确的获取伪元素的方法,但是却可以通过**getComputedStyle()**获取伪元素的属性
语法: getComputedStyle(‘元素’,’伪类’)
getComputedStyle(‘元素’,null) 获取元素
(2)getPropertyValue() 获取该伪元素的属性值
语法:getPropertyValue(‘css属性’)
1 2 3 4 5 6 7 8 9 10 11 12 13 14 15 16 17 18 19 20 21 22 23 24 25 26 27 28 29 30 31 32 <!DOCTYPE html > <html lang ="en" > <head > <meta charset ="UTF-8" > <meta http-equiv ="X-UA-Compatible" content ="IE=edge" > <meta name ="viewport" content ="width=device-width, initial-scale=1.0" > <title > Document</title > <style > div ::after { content : "伪元素" ; font-size : 20px ; } </style > </head > <body > <div > </div > <script > var divAfter = document .querySelector ('div' ); let sty = window .getComputedStyle (divAfter, ":after" ).content ; console .log (sty); let sty1 = window .getComputedStyle (divAfter, ":after" ).getPropertyValue ('font-size' ); console .log (sty1); </script > </body > </html >
事件三要素
事件源 事件被触发的对象 事件类型 如何触发什么事件 事件处理程序 触发什么事件
1 2 3 4 5 6 7 8 9 10 11 12 13 14 <body > <button id ="btn" > 演示按钮</button > <script > var btn = document .getElementById ('btn' ); btn.onclick = function ( alert ('弹出框' ); } </script > </body >
innerXXX修改元素内容 innerText和innerHTML的区别
innerText 不识别html标签 非标准innerHTML 识别标签 W3C标准outerHTML 获取节点本身和其里面的内容
textContent 仅仅获取文本 (类似innerText)
1 2 3 4 5 6 7 8 9 10 11 12 13 14 15 16 17 18 19 <body > <div > </div > <p > 我是文字 <span > 123</span > </p > <script > var div = document .querySelector ('div' ); div.innerHTML = '<b>今天是:</b>2022' ; var p = document .querySelector ('p' ); console .log (p.innerText ); console .log (p.innerHTML ); </script > </body >
修改元素属性 1.修改节点属性 1 2 3 4 5 6 7 8 9 10 11 12 13 14 15 16 17 18 19 20 21 22 <body > <button id ="p1" > p1</button > <button id ="p2" > p2</button > <img src ="../../../img/图片/cs (1).webp" alt ="" title ="p1" > <script > var p1 = document .getElementById ('p1' ); var p2 = document .getElementById ('p2' ); var img = document .querySelector ('img' ); p2.onclick = function ( img.src = '../../../img/图片/cs (2).webp' img.title = 'p2' ; }; p1.onclick = function ( img.src = '../../../img/图片/cs (1).webp' img.title = 'p1' ; }; </script > </body >
获取到元素节点存放到一个变量 后可以直接打点调用 这个节点的属性 更改
2.修改表单属性 1 2 3 4 5 6 7 8 9 10 11 12 13 14 15 16 17 18 19 <body > <button > 按钮</button > <input type ="text" value ="输入内容" > <script > var btn = document .querySelector ('button' ); var input = document .querySelector ('input' ); btn.onclick = function ( input.value = '点击了' ; this .disabled = true ; } </script > </body >
如果想要某个表单被禁用 不能被点击 disable 想要按钮button被禁用
btn.disabled = true ;
3.修改样式属性 1 2 3 4 5 6 7 8 9 10 11 12 13 14 15 16 17 18 19 20 21 22 23 24 25 26 27 28 29 30 31 32 33 <!DOCTYPE html > <html lang ="en" > <head > <meta charset ="UTF-8" > <meta http-equiv ="X-UA-Compatible" content ="IE=edge" > <meta name ="viewport" content ="width=device-width, initial-scale=1.0" > <title > Document</title > <style > div { width : 200px ; height : 200px ; background-color : pink; } </style > </head > <body > <div > </div > <script > var div = document .querySelector ('div' ); div.onclick = function ( this .style .backgroundColor = 'black' ; this .style .width = '250px' ; } </script > </body > </html >
触发事件 将样式改为****行内样式
4.className修改样式属性 1 2 3 4 5 6 7 8 9 10 11 12 13 14 15 16 17 18 19 20 21 22 23 24 25 26 27 28 29 30 31 32 33 34 35 36 37 38 39 40 41 42 43 44 45 <!DOCTYPE html > <html lang ="en" > <head > <meta charset ="UTF-8" > <meta http-equiv ="X-UA-Compatible" content ="IE=edge" > <meta name ="viewport" content ="width=device-width, initial-scale=1.0" > <title > Document</title > <style > div { width : 200px ; height : 200px ; background-color : pink; } .change { background-color : black; color : #fff ; font-size : 25px ; } </style > </head > <body > <div class ="first" > 文本内容</div > <script > var div = document .querySelector ('div' ); div.onclick = function ( this .className = 'change' ; this .className = 'first change' ; } </script > </body > </html >
通过 .className****修改节点类名
关于classList
🔗🔗classList🔗🔗 node存放接收节点的变量
node.classList 返回一个Object里面存放类名 node.classList.add(‘类名’) 添加新的类名 node.classList.remove(‘类名’) 删除对另类名 node.classList.item(索引) node.classList.toggle(“类名”); 引号中的类名,有就删除,没有就添加
5.排他思想案例 1 2 3 4 5 6 7 8 9 10 11 12 13 14 15 16 17 18 19 20 21 22 23 24 25 26 27 28 29 30 31 32 33 34 35 <!DOCTYPE html > <html lang ="en" > <head > <meta charset ="UTF-8" > <meta http-equiv ="X-UA-Compatible" content ="IE=edge" > <meta name ="viewport" content ="width=device-width, initial-scale=1.0" > <title > Document</title > </head > <body > <button > 按钮1</button > <button > 按钮2</button > <button > 按钮3</button > <button > 按钮4</button > <button > 按钮5</button > <script > var btns = document .getElementsByTagName ('button' ); for (var i = 0 ; i < btns.length ; i++) { btns[i].onclick = function ( for (var i = 0 ; i < btns.length ; i++) { btns[i].style .backgroundColor = '' ; } this .style .backgroundColor = 'pink' ; } } </script > </body > </html >
获取/设置自定义属性 H5之前的获取/设置自定义属性 .getAttribute(‘属性’) 获取 get(得到)
attribute(属性)
1 2 3 4 5 6 7 8 9 10 11 12 13 <body > <div id ="demo" index ="1" > </div > <script > var div = document .querySelector ('div' ); console .log (div.id ); console .log (div.getAttribute ('id' )); console .log (div.getAttribute ('index' )); </script > </body >
.setAttribute(‘属性’,’值’) 设置 set(设置)
attribute(属性)
1 2 3 4 5 6 7 8 9 10 11 <body > <div id ="demo" index ="1" > </div > <script > div.id = 'text' ; div.setAttribute ('index' , '2' ); div.setAttribute ('class' , '3' ); </script > </body >
.removeAttribute(属性) 删除 remove(删除)
attribute(属性)
1 2 3 4 5 6 7 <body > <div id ="demo" index ="1" > </div > <script > div.removeAttribute ('index' ); </script > </body >
.attributes获取属性集合 (所有属性) H5自定义属性 ##H5规定自定义属性data-开头做为属性名并且赋值##
1 2 3 4 5 6 7 8 9 10 11 12 13 14 15 16 17 18 19 20 21 22 23 <body > <div getTime ="20" data-index ="2" data-list-name ="andy" > </div > <script > var div = document .querySelector ('div' ); console .log (div.getAttribute ('getTime' )); div.setAttribute ('data-index' , 'data-index:20' ) console .log (div.getAttribute ('data-index' )); console .log (div.dataset ); console .log (div.dataset .index ); console .log (div.dataset ['index' ]); console .log (div.dataset .listName ); console .log (div.dataset ['listName' ]); </script > </body >
h5新增获取自定义属性方法
dataset获取自定义属性 data开头属性 dataset 是一个集合里面存放了所有以data开头的自定义属性
如果自定义属性里面有多个**-链接的单词,我们获取的时候采取 驼峰命名法**
节点操作 父子节点 1 2 3 4 5 6 7 8 9 10 11 12 13 14 15 16 17 18 19 20 21 22 23 24 25 26 27 28 29 30 31 32 33 34 35 36 37 38 39 40 41 42 43 44 45 46 47 48 49 50 51 <body > <div > 我是div</div > <span > 我是span</span > <ul > <li > 我是li1</li > <li > 我是li2</li > <li > 我是li3</li > <li > 我是li4</li > <li > 我是li5</li > </ul > <ol > <li > 我是li1</li > <li > 我是li2</li > <li > 我是li3</li > <li > 我是li4</li > <li > 我是li5</li > </ol > <div class ="box" > <span class ="erweima" > X</span > </div > <script > var erweima = document .querySelector ('.erweima' ); console .log (erweima.parentNode ); var ul = document .querySelector ('ul' ); var lis = document .querySelectorAll ('li' ); console .log (ul.childNodes ); console .log (ul.childNodes [0 ].nodeType ); console .log (ul.children ); console .log (ul.firstChild ); console .log (ul.lastChild ); console .log (ul.firstElementChild ); console .log (ul.children [0 ]); console .log (ul.children [ul.children .length - 1 ]); </script > </body >
父节点 node 节点
node.parentNote 得到的是离元素最近的父级元素节点(亲父级) 如果找不到就返回空 null
(只包含元素节点)
node.parentElement 得到的是离元素最近的父级元素节点(亲父级) 如果找不到就返回空 null
(只包含元素节点)
子节点 node.childNodes 得到node所有的子节点*(既包含元素节点、文本节点、注释节点)*
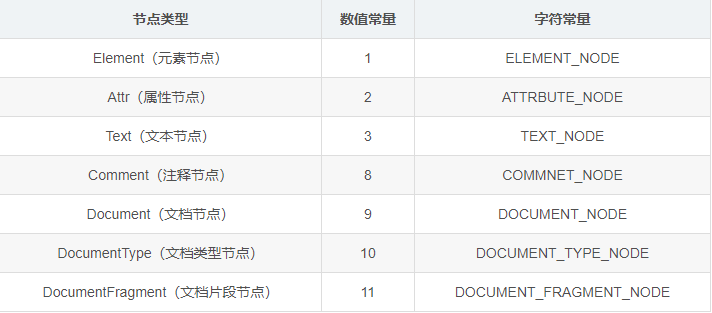
node.childNodes[0].nodeType 该节点的节点类型(返回一个数值)
node.children 获取node所有的子元素节点 实际开发常用的*(只包含元素节点)*
node.firstChild 子节点第一个节点*(既包含元素节点、文本节点、注释节点)*
node.lastChild 子节点最后一个节点*(既包含元素节点、文本节点、注释节点)*
childElementCount 返回子元素(不包括文本节点和注释)的个数
实际开发中获取方法
兄弟节点 1 2 3 4 5 6 7 8 9 10 11 12 13 14 15 16 17 18 19 20 21 22 23 24 25 26 <body > <div > 我是div</div > <span > 我是span</span > <script > var div = document .querySelector ('div' ); console .log (div.nextSibling ); console .log (div.previousSibling ); console .log (div.nextElementSibling ); console .log (div.previousElementSibling ); function getNextElementSibling (element ) { var el = element; while (el = el.nextSibling ) { if (el.nodeType === 1 ) { return el; } } return null ; } </script > </body >
node.nextSibling 下一个兄弟节点:(既包含元素节点、文本节点、注释节点)
node.previousSibling 获取node的上一个兄弟节点*:(既包含元素节点、文本节点、注释节点)*
node.nextElementSibling 获取node的下一个兄弟元素节点*:(只包含元素节点)*
node.previousElementSibling 获取node的上一个兄弟元素节点*:(只包含元素节点)*
创建添加节点 1 2 3 4 5 6 7 8 9 10 11 12 13 14 15 16 17 <body > <ul > <li > 123</li > </ul > <script > var li = document .createElement ('li' ); var ul = document .querySelector ('ul' ); ul.appendChild (li); var lili = document .createElement ('li' ); ul.insertBefore (lili, ul.children [0 ]); </script > </body >
1.创建节点 document.createElement (‘标签 自动识别单双标签
2.添加节点 node.appendChild (child) node父级 child 是子级 后面追加元素 类似于数组中的push
node.insrtBefore (child,指定元素) 在指定元素的前面添加元素
3.替换节点 node.replaceChild (child,指定元素) 要替换的节点从文档中删除,同时要插入的节点占据它的位置
删除节点 1 2 3 4 5 6 7 8 9 10 11 12 13 14 15 16 17 18 19 20 <body > <button > 删除</button > <ul > <li > 熊大</li > <li > 熊二</li > <li > 光头强</li > </ul > <script > var ul = document .querySelector ('ul' ); var btn = document .querySelector ('button' ); btn.onclick = function ( if (ul.children .length == 0 ) { this .disabled = true ; } else { ul.removeChild (ul.children [0 ]); } } </script > </body >
删除元素 node.removeChild(child)
复制克隆节点 **node.cloneNode( )**只复制标签 不复制内容
**node.cloneNode(true)**内容标签全部复制
1 2 3 4 5 6 7 8 9 10 11 12 13 14 15 16 <body > <ul > <li > 1111</li > <li > 2</li > <li > 3</li > </ul > <script > var ul = document .querySelector ('ul' ); var lili = ul.children [0 ].cloneNode (true ); ul.appendChild (lili); </script > </body >
注册/删除事件 注册事件 1.传统注册事件 唯一性
2.方法监听注册事件 addEventListener ie9以上
里面的事件类型是字符串必定加引号而月不带on
同一个元素同一个事件可以添加多个侦听器( 事件处理程序)
3.attachEvent事件监听方式 仅了解不提倡使用
删除事件 1.传统方式解绑 node’元素’ node.onclick=null
2.removeEventListener 删除事件
3.老办法attachEvent 仅在ie9之前可用
DOM事件流代码验证 dom事件流三个阶段
JS代码中只能执行捕获或者冒泡其中的一个阶段。
onclick和attachEvent (ie)只能得到冒泡阶段。
捕获阶段 如果addEventListener第三个参数是true 那么则处于捕获阶段 document->html->body->father->son
捕获阶段
当点击son 会依次触发从根元素到目标节点 的事件
结果: 触发father - son
冒泡阶段
当点击son 会依次触发从目标元素到根节点 的事件
结果: 触发son - father
1 2 3 4 5 6 7 8 9 10 11 12 13 14 15 16 17 18 19 20 21 22 23 24 25 26 27 28 29 30 31 32 33 34 35 36 37 38 39 40 41 42 43 44 45 46 47 48 49 50 51 52 53 54 55 56 57 58 59 60 61 62 63 64 65 66 67 68 <!DOCTYPE html > <html lang ="en" > <head > <meta charset ="UTF-8" > <meta http-equiv ="X-UA-Compatible" content ="IE=edge" > <meta name ="viewport" content ="width=device-width, initial-scale=1.0" > <title > Document</title > <style > body , :root { display : flex; justify-content : center; align-items : center; height : 100vh ; } .father { display : flex; align-items : center; justify-content : center; width : 100px ; height : 100px ; background-color : pink; } .son { width : 50px ; height : 50px ; background-color : rebeccapurple; } </style > </head > <body > <div class ="father" > <div class ="son" > son盒子</div > </div > <script > var son = document .querySelector ('.son' ); son.addEventListener ('click' , function ( alert ('son' ); }, true ); var father = document .querySelector ('.father' ); father.addEventListener ('click' , function ( alert ('father' ); }, true ); </script > </body > </html >
e.target和this的区别 event对象 e.target/this 1 2 3 4 5 6 7 8 9 10 11 12 13 14 15 16 17 18 19 20 21 22 23 24 25 26 27 28 29 30 31 32 33 34 35 36 37 38 39 40 41 42 43 44 45 46 47 48 49 50 51 52 53 54 <!DOCTYPE html > <html lang ="en" > <head > <meta charset ="UTF-8" > <meta http-equiv ="X-UA-Compatible" content ="IE=edge" > <meta name ="viewport" content ="width=device-width, initial-scale=1.0" > <title > Document</title > <style > div { width : 100px ; height : 100px ; background-color : yellow; } </style > </head > <body > <div > 123 </div > <ul > <li > abc</li > <li > abc</li > <li > abc</li > </ul > <script > var div = document .querySelector ('div' ); div.addEventListener ('click' , function (e ) { console .log (e.target ); console .log (this ); }) var ul = document .querySelector ('ul' ); ul.addEventListener ('click' , function (e ) { console .log (this ); console .log (e.target ); }) </script > </body > </html >
常见事件对象的属性和方法 this返回的的是绑定事件的对象(元素)
区别:
e.target 点击了那个元素,就返回那个元素this 哪个元素绑定了这个点击事件,那么就返回谁e.target.selectedIndex 获取被点击子元素的索引
阻止默认行为 event对象 1.返回事件类型e.type
此时当触发事件时,就在控制台输出所触发的事件类型
2.阻止默认行为(事件) 让链接不跳转 或者让提交按钮不提交
3.传统方式 return false
4.阻止冒泡
e.stopPropagation(); stop停止 Propagation 传播 常规做法 e.cancelBubble=true; cancle取消 bubble泡泡 传统做法
1 2 3 4 5 6 7 8 9 10 11 12 13 14 15 16 17 18 19 20 21 22 23 24 25 26 27 28 29 30 31 32 33 34 35 36 37 38 39 40 41 42 43 44 45 46 47 48 49 50 51 52 53 54 55 56 57 <!DOCTYPE html > <html lang ="en" > <head > <meta charset ="UTF-8" > <meta http-equiv ="X-UA-Compatible" content ="IE=edge" > <meta name ="viewport" content ="width=device-width, initial-scale=1.0" > <title > Document</title > <style > .father { margin : 100px auto; display : flex; align-items : center; justify-content : center; width : 200px ; height : 200px ; background-color : pink; } .son { width : 150px ; height : 150px ; background-color : rebeccapurple; color : white; font-size : 20px ; line-height : 150px ; text-align : center; } </style > </head > <body > <div class ="father" > <div class ="son" > son盒子</div > </div > <script > var son = document .querySelector ('.son' ); son.addEventListener ('click' , function (e ) { alert ('son' ); e.cancelBubble = true ; }, false ); var father = document .querySelector ('.father' ); father.addEventListener ('click' , function (e ) { alert ('father' ); e.stopPropagation (); }, false ); document .addEventListener ('click' , function ( alert ('document' ); }, false ) </script > </body > </html >
5.事件委托 1 2 3 4 5 6 7 8 9 10 11 12 13 14 15 16 17 18 19 20 21 22 <body > <ul > <li > 点击弹框</li > <li > 点击弹框</li > <li > 点击弹框</li > <li > 点击弹框</li > <li > 点击弹框</li > </ul > <script > var ul = document .querySelector ('ul' ); var lis = document .querySelectorAll ('li' ); ul.addEventListener ('click' , function (e ) { for (var i = 0 ; i < lis.length ; i++) { lis[i].style .backgroundColor = '' ; } e.target .style .backgroundColor = 'pink' ; }) </script > </body >
事件委托核心原理 给父节点添加侦听器,利用事件冒泡影响每一个子节点
🔗🔗事件委托🔗🔗
6.禁止选中和右键行为 1 2 3 4 5 6 7 8 9 10 11 12 13 14 <body > 演示文本-无法选中文本-无法右键菜单 <script > document .addEventListener ('contextmenu' , function (e ) { e.preventDefault (); }) document .addEventListener ('selectstart' , function (e ) { e.preventDefault (); }) </script > </body >
鼠标事件 / 坐标问题 1.client 鼠标在可视区域的坐标
2.page 鼠标在文档的坐标 兼容问题
涵盖了被卷去的部分
3.screen 鼠标在电脑屏幕的坐标
click:单击事件。
dblclick:双击事件。
mousedown:按下鼠标键时触发。
mouseup:松开按下的鼠标键时触发。
mousemove:鼠标移动事件。
mouseover:移入事件。
mouseout:移出事件。
mouseenter:移入事件。
mouseleave:移出事件。
contextmenu:右键事件。
mouseover事件和mouseenter事件,都是鼠标进入一个节点时触发。两者的区别是,mouseenter事件只触发一次,而只要鼠标在节点内部移动,mouseover事件会在子节点上触发多次。
在mouseover事件下,当鼠标移入父盒子会触发事件,但是从子盒子移入父盒子也会触发一次事件
在mouseenter事件下,当鼠标移入父盒子中的子盒子,再移出子盒子并不会触发两次
1 2 3 4 5 6 7 8 9 10 11 12 13 14 15 16 17 18 19 20 21 22 23 24 25 26 27 28 29 30 31 32 33 34 35 36 37 38 39 40 41 42 <!DOCTYPE html > <html lang ="en" > <head > <meta charset ="UTF-8" > <meta http-equiv ="X-UA-Compatible" content ="IE=edge" > <meta name ="viewport" content ="width=device-width, initial-scale=1.0" > <title > Document</title > <style > .father { margin : 100px auto; width : 200px ; height : 200px ; background-color : pink; } .son { width : 100px ; height : 100px ; background-color : purple; } </style > </head > <body > <div class ="father" > <div class ="son" > </div > </div > <script > var father = document .querySelector ('.father' ); var son = document .querySelector ('.son' ); father.addEventListener ('mouseenter' , function ( console .log (11 ); }) </script > </body > </html >
🔗🔗鼠标事件blog🔗🔗
1 2 3 4 5 6 7 8 9 10 11 12 13 14 15 16 17 18 19 20 21 22 23 24 25 26 27 28 29 30 31 <!DOCTYPE html > <html lang ="en" > <head > <meta charset ="UTF-8" > <meta http-equiv ="X-UA-Compatible" content ="IE=edge" > <meta name ="viewport" content ="width=device-width, initial-scale=1.0" > <title > Document</title > <style > img { position : absolute; } </style > </head > <body > <img src ="../../CSS/touxiang.png" alt ="" > <script > var pic = document .querySelector ('img' ); document .addEventListener ('mousemove' , function (e ) { var x = e.pageX ; var y = e.pageY ; pic.style .left = x - 82 + 'px' ; pic.style .top = y - 82 + 'px' ; }) </script > </body > </html >
仿京东放大镜案例 1 2 3 4 5 6 7 8 9 10 11 12 13 14 15 16 17 18 19 20 21 22 23 24 25 26 27 28 29 30 31 32 33 34 35 36 37 38 39 40 41 42 43 44 45 46 47 48 49 50 51 52 53 54 55 56 57 58 59 60 61 62 63 64 65 66 67 68 69 70 71 72 73 74 75 76 77 78 79 80 81 82 83 84 85 86 87 88 89 90 91 92 93 94 95 96 97 98 99 100 101 102 103 104 105 106 107 108 <!DOCTYPE html > <html lang ="en" > <head > <meta charset ="UTF-8" > <meta http-equiv ="X-UA-Compatible" content ="IE=edge" > <meta name ="viewport" content ="width=device-width, initial-scale=1.0" > <title > Document</title > <style > .preview_img { width : 500px ; height : 285px ; position : relative; cursor : move; margin : 0 auto; } .preview_img >img { width : 100% ; } .mask { display : none; position : absolute; width : 250px ; height : 250px ; background-color : yellow; opacity : 0.5 ; } .big { display : none; position : absolute; left : 50px ; width : 400px ; height : 400px ; overflow : hidden; position : relative; border : 5px solid gray; } .big img { position : absolute; top : 0 ; left : 0 ; } </style > </head > <body > <div class ="preview_img" > <img src ="./001.jpg" alt ="" > <div class ="mask" > </div > <div class ="big" > <img src ="./001.jpg" alt ="" style ="width: 800px;" class ="bigImg" > </div > </div > <script > var preview_img = document .querySelector ('.preview_img' ); var mask = document .querySelector ('.mask' ); var big = document .querySelector ('.big' ); preview_img.addEventListener ('mouseover' , function ( mask.style .display = 'block' ; big.style .display = 'block' ; }) preview_img.addEventListener ('mouseout' , function ( mask.style .display = 'none' ; big.style .display = 'none' ; }) preview_img.addEventListener ('mousemove' , function (e ) { var x = e.pageX - this .offsetLeft ; var y = e.pageY - this .offsetTop ; var maskX = x - mask.offsetWidth / 2 ; var maskY = y - mask.offsetHeight / 2 ; var maskMax = preview_img.offsetWidth - mask.offsetWidth ; if (maskX <= 0 ) { maskX = 0 ; } else if (maskX >= maskMax) { maskX = maskMax; } if (maskY <= 0 ) { maskY = 0 ; } else if (maskY >= preview_img.offsetHeight - mask.offsetHeight ) { maskY = preview_img.offsetHeight - mask.offsetHeight ; } mask.style .left = maskX + 'px' ; mask.style .top = maskY + 'px' ; var bigImg = document .querySelector ('.bigImg' ); var bigMax = bigImg.offsetWidth - big.offsetWidth ; var bigX = maskX * bigMax / maskMax; var bigY = maskY * bigMax / maskMax; bigImg.style .left = -bigX + 'px' ; bigImg.style .top = -bigY + 'px' ; }) </script > </body > </html >
键盘事件 1. keyup 按键弹起的时候触发
2. keydown 按键按下的时候触发
3. keypress 按键按下的时候触发
keypress区分字母大小写 不识别功能键 ctrl shift 方向键
执行顺序 keydown-keypress-keyup
4.e.keyCode获取相应的ASCII码值
keyup 和keydown 不区分字母大小写keypress 区分字母大小写
5.e.key获取按键的字符 6.e.ctrlKey判断是否为ctrl键 返回**布尔值 表单事件 1.获取焦点onfocus 2.失去焦点onblur 3.onchange下拉菜单选择时触发 5.选择时触发onselect 光标框选时 6.提交时触发onsubmit 7.重置时触发onreset 1 2 3 4 5 6 7 8 9 10 11 12 13 14 15 16 17 18 19 20 21 22 23 24 25 26 27 28 29 30 31 32 33 34 35 36 37 38 39 40 41 42 43 44 45 46 47 48 49 50 51 52 53 54 55 56 57 58 59 60 61 62 63 64 65 66 67 68 69 70 71 72 73 74 75 76 77 78 79 80 81 82 83 84 85 86 <!DOCTYPE html > <html lang ="en" > <head > <meta charset ="UTF-8" > <meta http-equiv ="X-UA-Compatible" content ="IE=edge" > <meta name ="viewport" content ="width=device-width, initial-scale=1.0" > <title > Document</title > </head > <body > <div id ="box" > <div > <input type ="text" onfocus ="focusFn()" placeholder ="获取焦点" > </div > <div > <input type ="text" onblur ="blurFn()" placeholder ="失去焦点" > </div > <div > <select > <option value ="01" > p1</option > <option value ="02" selected > p2</option > <option value ="03" > p3</option > <option value ="04" > p4</option > </select > </div > <div > <input type ="text" oninput ="inputFn(this)" placeholder ="输入时触发" > <h2 class ="h2" > </h2 > </div > <div > <input type ="text" onselect ="selectFn(this)" placeholder ="选择时触发" > </div > <form onsubmit ="submitFn()" onreset ="resetFn()" > <input type ="submit" value ="提交" /> <input type ="reset" value ="重置" /> </form > </div > <script type ="text/javascript" > function focusFn ( console .log ("获取焦点" ); } function blurFn ( console .log ("失去焦点了" ); } var sel = document .querySelector ("select" ); sel.onchange = function ( console .log (this .value ); } let h2 = document .querySelector ('h2' ); function inputFn (self ) { console .log (self.value ); h2.innerHTML = self.value ; } function selectFn (self ) { console .log (self.value ); } function submitFn ( console .log ('提交了' ); } function resetFn ( console .log ('重置了' ); } </script > </body > </html >
内容高度/宽度 不包含边框 包含padding
scrollTop 就是滚动条向下滚动上面被隐藏部分的高度 并不适用于页面窗口
1 2 3 4 5 6 7 8 9 10 11 12 13 14 15 16 17 18 19 20 21 22 23 24 25 26 27 28 29 30 31 32 33 <!DOCTYPE html > <html lang ="en" > <head > <meta charset ="UTF-8" > <meta http-equiv ="X-UA-Compatible" content ="IE=edge" > <meta name ="viewport" content ="width=device-width, initial-scale=1.0" > <title > Document</title > <style > div { width : 200px ; height : 200px ; background-color : pink; padding : 10px ; overflow : auto; } </style > </head > <body > <div > 内容内容内容内容内容内容 内容内容内容内容内容内容 内容内容内容内容内容内容 内容内容内容内容内容内容 内容内容内容内容内容内容 内容内容内容内容内容内容 内容内容内容内容内容内容 内容内容内容内容内容内容 内容内容内容内容内容内容 内容内容内容内容内容内容 内容内容内容内容内容内容 内容内容内容内容内容内容 内容内容内容内容内容内容 内容内容内容内容内容内容 </div > <script > div.addEventListener ('scroll' , function ( console .log (div.scrollTop ); }); </script > </body > </html >
页面加载事件 window.onload 页面全部加载完毕才去执行
只能写一个会以最后一个为主
1 2 3 4 5 6 7 8 9 10 11 12 13 14 15 16 17 18 19 20 21 22 23 24 25 <body > <script > window .onload = function ( var btn = document .querySelector ('button' ); btn.addEventListener ('click' , function ( alert ('点击我' ); }) } window .addEventListener ('load' , function ( alert ('点击我' ); }) document .addEventListener ('DOMContentLoaded' , function ( alert (33 ) }) </script > <button > 点击</button > </body >
调整窗口事件 resize 调整窗口触发
window.innerWidth 获取窗口宽度 window.innerHeight 获取窗口高度
1 2 3 4 5 6 7 8 9 10 <script > window .addEventListener ('load' , function ( var div = document .querySelector ('div' ); window .addEventListener ('resize' , function ( console .log (window .innerWidth ); console .log (window .innerHeight ); }) }) </script >
定时器 setTimeout 语法规范:windows.setTimeout(调用函数,延时时间);
这个window在调用的时候可以省略
这个延时时间单位i毫秒 但可以省略 如果省略则默认为0
这个调用函数可以直接写函数 还可以写函数名 还有一个写法 ‘函数名()’
页面中可能有很多定时器,我们经常给定时器加标识符 (名字)
异步任务
清除定时器clearTimeout(变量) clearTimeout(变量)
1 2 3 4 5 6 7 8 9 10 11 12 <body > <button > 点击停止定时器</button > <script > var btn = document .querySelector ('button' ); var time = setTimeout (function ( console .log ('爆炸了' ); }, 5000 ); btn.addEventListener ('click' , function ( clearTimeout (time); }); </script > </body >
setInterval window.setInterval(回调函数,[间隔毫秒数]);
每隔**[间隔毫秒数]**触发一次函数
清除定时器clearInterval(变量) clearInterval(变量)
this指向 this指向问题一般情况下this的最终指向的是那个调用它的对象
1.全局作用域或者普通函数中this 指向全局对象window (注意定时器里面的this指向window )
1 2 3 4 5 6 <script > console .log (this ); </script >
2.函数中的this
注:匿名函数 this
3.定时器中的this
4.对象或者构造函数中的this 1 2 3 4 5 6 7 8 9 10 11 12 13 14 15 16 <script > var o = { sayHi : function ( console .log (this ); } } o.sayHi (); function fun (name, age ) { this .name = name; this .age = age; console .log (this ); } var fun = new fun (); </script >
对象中的this 指向它本身
构造函数中的this 指向它这个构造函数
构造函数中的this因为new的过程使得this指向发生了转移
new的整个过程:
new会在内存中创建一个新的空对像
new会让this指向这个新对象
执行构造函数中的代码
return这个新对象
5.绑定事件中的this 谁绑定事件this 就指向谁
6.箭头函数this指向 特殊性 箭头函数的this指向它的父作用域,箭头函数声明在全局作用域下其this指向window,若不在全局作用域下,this指向其父作用域
箭头函数的this永远指向其父作用域,箭头函数没有自己的this
普通函数
箭头函数
改变this指向方法 1.call()方法 常用于继承 call(无数个参数);
第一个参数:改变this指向
第二个参数:实参
使用之后会自动执行该函数,不适合用在定时器处理函数或者事件处理函数
2.apply()方法 apply(两个参数)
第一个参数:改变this指向
第二个参数:数组或者伪数组(里面为实参)
特点:使用时候会自动执行函数,不适合用在定时器处理函数或者事件处理函数
3.bind()方法 bind(无数个参数)
第一个参数:改变this指向
第二个参数之后:实参
返回值为一个新的函数
使用的时候需要手动调用下返回的新函数(不会自动执行)
作用:改变事件处理函数或者定时器处理函数的this指向
三者区别 call、apply 与bind 区别:前两个可以自动执行,bind 不会自动执行,需要手动调用
call、bind 与apply 区别:前两个都有无数个参数,apply 只有两个参数,而且第二个参数为**[数组]**
浏览器页面相关方法和事件 location
location.assign(‘url地址’) 记录浏览记录,有后退功能location.replace(‘url地址’) 不记录浏览记录,没有后退功能location.reload() 刷新页面location.href = ‘’ 跳转页面
1 2 3 4 5 6 7 8 9 10 11 12 13 14 <body > <button > 点击</button > <script > var btn = document .querySelector ('button' ); btn.addEventListener ('click' , function ( location.reload (); }) </script > </body >
history实现页面前进 仿浏览器前进页面 1 2 3 4 5 6 7 8 9 10 11 <body > <a href ="60-发送短信案例.html" > 点击我去往页面</a > <button > 前进</button > <script > var btn = document .querySelector ('button' ); btn.addEventListener ('click' , function ( history.forward (); }) </script > </body >
点击a标签跳转页面再返回此时再次点击前进按钮则会实现页面跳转
实现浏览器前进后退效果
pageshow事件 当点击a标签跳转后,再退回后不会再触发alert方法,通过pageshow 事件即可解决
1 2 3 4 5 6 7 8 9 10 11 <body > <a href ="http//www.baidu.com" > 链接</a > <script > window .addEventListener ('pageshow' , function ( alert (11 ); }); </script > </body >
1.offset offsetTop/offsetLeft 可以得到元素的偏移位置返回的不带单位的数值
它以带有定位的父亲为准 如果有父亲或者父亲没有定位 则以body为准
window.pageYoffset 页面卷去的高度 offsetWidth/offsetHeight 可以得到元素大小 宽度和高度 是包含 padding + border + width;
与style的区别:
offset 可以得到任意样式表中的样式值(数字型) 包含padding值 style 只能得到行内样式表中的样式值(字符串型) 不包含padding值
offsetX / offsetY 元素距其父元素 的偏移坐标
offsetParent 返回带有定位的父亲 否则返回的是body
1 2 3 4 5 6 7 8 9 10 11 12 13 14 15 16 17 18 19 20 21 22 23 24 25 26 27 28 29 30 31 32 33 34 35 36 37 38 39 40 41 42 43 44 45 46 47 48 49 50 51 52 53 54 55 56 57 58 59 60 61 62 63 64 65 66 <!DOCTYPE html > <html lang ="en" > <head > <meta charset ="UTF-8" > <meta http-equiv ="X-UA-Compatible" content ="IE=edge" > <meta name ="viewport" content ="width=device-width, initial-scale=1.0" > <title > Document</title > <style > * { margin : 0 ; padding : 0 ; } .father { position : relative; width : 200px ; height : 200px ; background-color : pink; margin : 100px ; } .son { width : 100px ; height : 100px ; background-color : purple; margin-left : 45px ; } .w { width : 200px ; height : 200px ; background-color : royalblue; margin : 0 auto 200px ; padding : 10px ; border : 15px solid red; } </style > </head > <body > <div class ="father" > <div class ="son" > </div > </div > <div class ="w" > </div > <script > var father = document .querySelector ('.father' ); var son = document .querySelector ('.son' ); console .log (father.offsetTop ); console .log (father.offsetLeft ); console .log (son.offsetLeft ); var w = document .querySelector ('.w' ); console .log (w.offsetWidth ); console .log (w.offsetHeight ); console .log (son.offsetParent ); console .log (son.parentNode ); </script > </body > </html >
scroll 计算出的高度或者宽度涵盖了被折叠部分
document.documentElement**.scroll**(0, 100);
document.documentElement**.scrollTo**(0, 100);
document.documentElement**.scrollBy**(0, 100);
scrollTo 是’到达’,**.scrollTo**(0, 100)是固定到达100,当你已经在100则无法再次执行scrollBy 是’执行’,**.scrollBy**(0, 100)是每当点击一次则移动100,可重复执行scroll 和scrollTo 一样,没什么区别
scrollTop 指的是“元素中的内容”超出“元素上边界”的那部分的高度。
3.client 最大的区别就是client 不包含边框
输出的高度/宽度是可视内容的高度/宽度 (人眼看到的部分大小
[**🔗🔗clientX、offsetX、screenX、pageX的区别🔗🔗**](https://blog.csdn.net/Serena_tz/article/details/113939879?ops_request_misc=&request_id=&biz_id=102&utm_term=clientx screenx pagex offsetx &utm_medium=distribute.pc_search_result.none-task-blog-2allsobaiduweb~default-1-113939879.142^v16^control,157^v14^control&spm=1018.2226.3001.4187)
案例 ‘获取鼠标在盒子内坐标’ 1 2 3 4 5 6 7 8 9 10 11 12 13 14 15 16 17 18 19 20 21 22 23 24 25 26 27 28 29 30 31 32 33 34 <!DOCTYPE html > <html lang ="en" > <head > <meta charset ="UTF-8" > <meta http-equiv ="X-UA-Compatible" content ="IE=edge" > <meta name ="viewport" content ="width=device-width, initial-scale=1.0" > <title > Document</title > <style > .box { width : 200px ; height : 200px ; background-color : pink; margin : 200px ; } </style > </head > <body > <div class ="box" > </div > <script > var box = document .querySelector ('.box' ); box.addEventListener ('mousemove' , function (e ) { var x = e.pageX - this .offsetLeft ; var y = e.pageY - this .offsetTop ; this .innerHTML = 'x坐标是' + x + 'y坐标是' + y; }) </script > </body > </html >
封装一个动画函数
获得盒子当前位置
让盒子在当前位置加上1个移动距离
加一个结束定时器的条件
注意此元素需要添加定位,才能使用element.style.left
1 2 3 4 5 6 7 8 9 10 11 12 13 14 15 16 17 18 19 20 21 22 23 24 25 26 27 28 29 <script > function animate (obj, target, callback ) { clearInterval (obj.timer ); obj.timer = setInterval (function ( var step = (target - obj.offsetLeft ) / 10 ; step = step > 0 ? Math .ceil (step) : Math .floor (step); if (obj.offsetLeft == target) { clearInterval (obj.timer ); callback && callback (); } obj.style .left = obj.offsetLeft + step + 'px' ; }, 20 ) } </script >
节流和防抖 1.节流 节流就是指连续触发事件但是在 n 秒中只执行一次函数。节流会稀释函数的执行频率
1 2 3 4 5 6 7 8 9 10 11 12 13 14 15 16 17 18 19 20 21 22 23 24 25 26 27 28 29 30 31 32 33 34 35 36 37 38 39 40 41 42 43 <!DOCTYPE html > <html lang ="en" > <head > <meta charset ="UTF-8" > <meta http-equiv ="X-UA-Compatible" content ="IE=edge" > <meta name ="viewport" content ="width=device-width, initial-scale=1.0" > <title > Document</title > <style > div { width : 100px ; height : 100px ; background-color : black; transform : translateX (0px ); transition : all 0.5s ease; } </style > </head > <body > <button > 按钮</button > <div > </div > </body > <script > var btn = document .querySelector ('button' ); var div = document .querySelector ('div' ); var index = 0 ; var flag = true ; btn.addEventListener ('click' , function ( if (flag) { flag = false ; index = index + 100 ; div.style .transform = `translateX(${index} px)` ; setTimeout (function ( flag = true ; }, 500 ); }; }); </script > </html >
2.防抖 防抖就是指触发事件后在 n 秒内函数只能执行一次,如果在 n 秒内又触发了事件,则会重新计算函数执行时间。连续点击按钮只会重置500ms,只有最后一次点击时500ms后才会执行方法。
1 2 3 4 5 6 7 8 9 10 11 12 13 14 15 16 17 18 19 20 21 22 23 24 25 26 27 28 29 30 31 32 33 34 35 36 37 38 39 40 41 42 <!DOCTYPE html > <html lang ="en" > <head > <meta charset ="UTF-8" > <meta http-equiv ="X-UA-Compatible" content ="IE=edge" > <meta name ="viewport" content ="width=device-width, initial-scale=1.0" > <title > Document</title > <style > div { width : 100px ; height : 100px ; background-color : black; transform : translateX (0px ); transition : all 0.5s ease; } </style > </head > <body > <button > 按钮</button > <div > </div > </body > <script > var btn = document .querySelector ('button' ); var div = document .querySelector ('div' ); var index = 0 ; var timer = null ; btn.addEventListener ('click' , function ( if (timer !== null ) { clearTimeout (timer); }; timer = setTimeout (function ( index = index + 100 ; div.style .transform = `translateX(${index} px)` ; }, 500 ); }); </script > </html >
移动端事件
touchstart 点击事件 touchmove 拖动事件 touchend 松手事件
targetTouches[0] 就可以得到触摸dom元素的第一个手指的相关信息 比如手指的坐标
🔗🔗关于移动端手指触发事件blog🔗🔗
正则表达式
利用RegExp对象创建 正则表达式 var regexp = new RegExp(/123/) //要求输入123
利用字面量 创建正则表达式 var rg = /123/
test 方法用来检测字符串是否符合正则表达式要求规范 console.log(rg.test(123)) //true
var rag = /abc/
只要含有abc这个字符串返回的都是true
边界符 ^ $ var reg=/^abc/
^ 以谁开始 $ 以谁结束
字符类: var reg2=/[abc]/;
[ ] 表示有一系列字符可供选择 只是匹配其中一个就可
var reg3=/^[abc]$/
三选一 只有a 或是 b 或是 c 这三个字母才会返回true
var reg4=/^[a-z]$/
26个英文字母任何 一 个小写字母返回true
字符组合:
var reg5=/^[a-zA-Z0-9_-]$/
26个英文字母(大小全含)任何一字母返回true
取反 ^ :
var reg6=/^[^a-zA-Z0-9_-]$/
最里面的^表示取反 不能含有 a-zA-Z0-9_-
量次符: 用来设定某个模式出现的次数(简单理解就是让下面的a字符重复多少次)
var reg7=/^a*$/
*** 相当于 >=0 可以出现0次或多次**
var reg8=/^a+$/
+ 相当于 >=1 可以出现1次或多次
var reg9=/^a?$/
? 相当于 1 || 0 ,可以出现1次或0次
var rmg=/^a{3}$/
{3} 就是重复3次
在谁后面就代表前面的可以重复几次
var rmg1=/^a{3,}$/
{3,} 大于等于3次
var rmg2=/^a{3,6}$/
{3,6} 大于等于3次 并且小于等于6次
( )代表分组
统一化字符:
\d 匹配0-9之间任一数字,相当于 [0-9] \D 匹配所有0-9之外的字符,相当于 [^0-9] \w 匹配任意的字母,数字和下划线,相当于 [A-Za-z0-9_] \W 除所有字母,数字和下划线外的字符,相当于 [^A-Za-z0-9_] \s 匹配空格(包含换行符 制表符 空格符) 相当于 [\t\r\n\v\f] \S 匹配非空格字符,相当于 [^\t\r\n\v\f]
正则表达式替换 1 2 3 4 5 6 7 8 9 10 11 12 13 14 15 16 17 18 19 20 21 <body > <textarea name ="" id ="message" cols ="30" rows ="10" style ="resize: none;" > </textarea > <button > 提交</button > <div > </div > <script > var text = document .querySelector ('textarea' ); var btn = document .querySelector ('button' ); var div = document .querySelector ('div' ); btn.onclick = function ( div.innerHTML = text.value .replace (/操|gay|9/g , '*' ); }; </script > </body >
g 属于全局匹配
i 忽略大小写
gi 全局匹配+忽略大小写
中文编码范围 /[\u4e00-\u9fa5]/ /[\u4e00-\u9fa5]/ 中文编码范围\u4e00是一个unicode编码
常用正则表达式
手机号: /^1[3|4|5|6|7|8|9]\d{9}$/
密码: /^[a-zA-Z0-9_-]{6,16}$/
BOM操作扩展
什么是BOM? BOM(Browser Object Model)即浏览器对象模型,它提供了独立于内容而与浏览器窗口进行交互的对象,其顶级对象是 window,并且每个对象都提供了很多方法与属性
location对象 window 对象给我们提供了一个 location 属性用于获取或设置窗体的 URL,并且可以用于解析 URL
location对象属性 返回值
location.href
获取或设置整个url地址
location.host
返回主机(域名) www.baidu.com
location.port
获取或设置整个url地址
location.pathname
返回路径
location.search
返回参数
location.hash
返回片段 #后面内容,常用于链接锚点
location.protocol
返回协议
location对象方法 返回值
location.assign()
跟href一样,可以跳转页面(也称为重定向页面)
location.replace()
替换当前页面,因为不记录历史,所以不能后退页面
location.reload()
重新加载页面,相当于刷新按钮或者f5 如果参数为true 强制刷新ctrl+f5
点击按钮跳转页面案例: 1 2 3 4 5 6 7 8 9 <body > <button > location</button > </body > <script > let btn = document .querySelector ('button' ); btn.onclick = function ( location.href = 'https://blog.csdn.net/WYF857446152/article/details/124860285?ops_request_misc=%257B%2522request%255Fid%2522%253A%2522165595085816782391824458%2522%252C%2522scm%2522%253A%252220140713.130102334..%2522%257D&request_id=165595085816782391824458&biz_id=0&utm_medium=distribute.pc_search_result.none-task-blog-2~all~sobaiduend~default-1-124860285-null-null.142^v20^control,157^v15^new_3&utm_term=bom%E6%93%8D%E4%BD%9C&spm=1018.2226.3001.4187' ; } </script >
location.search接收返回的参数实现数据交互案例: 1 2 3 4 5 6 <body > <form action ="64-index.html" > 用户名: <input type ="text" name ="uname" > <input type ="submit" value ="登录" > </form > </body >
1 2 3 4 5 6 7 8 9 10 11 12 13 14 15 <body > <div > </div > <script > console .log (location.search ); var params = location.search .substr (1 ); console .log (params); var arr = params.split ('=' ); console .log (arr); var div = document .querySelector ('div' ); div.innerHTML = arr[1 ] + '欢迎您!' ; </script > </body >
navigator对象 navigator 对象包含有关浏览器的信息,它有很多属性,我们最常用的是 userAgent,该属性可以返回由客户机发送服务器的 user-agent 头部的值。
history对象 window对象给我们提供了一个 history对象,与浏览器历史记录进行交互。该对象包含用户(在浏览器窗口中)访问过的URL。
history对象方法 返回值
back()
可以后退功能
forward()
前进功能
go(参数)
前进后退功能 参数如果是1前进一个页面如果是-1后退一个页面
webstorag 会话存储之sessionStorage 用户上传的数据并不会传输到服务器而是保存在本地浏览器中*(浏览器历史记录原理)*
sessionStorage.setItem(‘uname’, val); 储存数据
sessionStorage.getItem(‘uname’); 获取数据
sessionStorage.removeItem(‘uname’); 删除数据
sessionStorage.clear( ); 清除所有数据
1 2 3 4 5 6 7 8 9 10 11 12 13 14 15 16 17 18 19 20 21 22 23 24 25 26 27 28 29 30 31 32 <body > <input type ="text" > <button class ="set" > 储存数据</button > <button class ="get" > 获取数据</button > <button class ="remove" > 删除数据</button > <button class ="del" > 清空所有数据</button > <script > var ipt = document .querySelector ('input' ); var set = document .querySelector ('.set' ); var get = document .querySelector ('.get' ); var remove = document .querySelector ('.remove' ); var del = document .querySelector ('.del' ); set.addEventListener ('click' , function ( var val = ipt.value ; sessionStorage.setItem ('uname' , val); sessionStorage.setItem ('pwd' , val); }); get.addEventListener ('click' , function ( console .log (sessionStorage.getItem ('uname' )); }); remove.addEventListener ('click' , function ( sessionStorage.removeItem ('uname' ); }); del.addEventListener ('click' , function ( sessionStorage.clear (); }); </script > </body >
本地存储之localStorage localStorage.setItem(‘username’, val) 储存数据
localStorage.getItem(‘username’) 获取数据
localStorage.removeItem(‘username’) 删除数据
localStorage.clear( ) 清除所有数据
1 2 3 4 5 6 7 8 9 10 11 12 13 14 15 16 17 18 19 20 21 22 23 24 25 26 27 <body > <input type ="text" > <button class ="set" > 储存数据</button > <button class ="get" > 获取数据</button > <button class ="remove" > 删除数据</button > <button class ="del" > 清空所有数据</button > <script > var ipt = document .querySelector ('input' ); var set = document .querySelector ('.set' ); var get = document .querySelector ('.get' ); var remove = document .querySelector ('.remove' ); var del = document .querySelector ('.del' ); set.addEventListener ('click' , function ( var val = ipt.value ; localStorage .setItem ('username' , val); }) get.addEventListener ('click' , function ( console .log (localStorage .getItem ('username' )); }) remove.addEventListener ('click' , function ( localStorage .removeItem ('username' ); }) del.addEventListener ('click' , function ( localStorage .clear (); }) </script > </body >
webStorage 和 cookie 的区别? 共同点: 都是保存在浏览器端,且同源的。
区别: cookie: 数据始终在同源的http请求中携带。cookie数据不能超 过4k,同时因为每次http请求都会携带cookie,所以cookie只适 合保存很小的数据。
sessionStorage和localStorage 不会自动把数据发给服务器,仅在本地保存。sessionStorage和localStorage 虽然也有存储大小的限制,但比cookie大得多,可以达到5M或更大。
大小不同 有效期不同 作用域不同